Wednesday, December 5, 2012

Upcycling Wine Bottles!

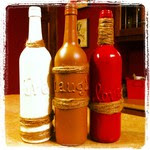
I normally take pretty frequent visits to the depot with my bottles, but they were really starting to build up, and good thing too, as I was over on my favorite site (Pinterest obviously) and was seeing so many wine bottle upcycles that I had to try one! I didn't really find a specific tutorial, I just kind of winged it (not saying there isn't one that did this exactly, I just didn't read this particular craft word for word, but meshed a few different ideas I saw!)

What you need:
- rinsed wine bottles with all the labels removed (I soak them in really hot water and they come right off, but you may need to really work off some remaining glue)
- glue gun and glue sticks
- spray paint of your choice (I tried brush painting them, and it didn't look nice, you can see the strokes and when you do a second coat, sometimes the paint comes off...)
- twine

What you do:
After your bottles are cleaned and the labels are removed, heat up your glue gun, and just glue on the bottle! You can do anything, I chose words this time to try it out, but you can do a pattern on it, or anything you want really!
Once that was dry (not long at all) I started to paint them with a brush. I didn't like the way this turned out, so I took them out on the deck and spray painted them. At this point they looked like this:


Then, I got the glue gun back out, and just wrapped twine around them very arbitrarily and glued it every now and again so it wouldn't move!

Result:


When I do it again:
I don't love these, but they are a good try at something I now know I can make really nice next time. Things I will do differently next time I make this:
1) All or none - make sure your wine bottles are all alike or all different. Two of these are the same, and one is different, and I think that looks off.
2) Make sure I plan what and how I will write. I love the read one, and I don't like my impulse "font" on the other two. I wish I had done it much nicer. I will plan it out on paper next time.
Finally, 3) I hate the twine. I will either skip it, use something else, or not make it so thick and bulky next time.

But, I think they are great, and they will make nice gifts once I perfect this new craft project!


Altering Curtains

Unfortunately I didn't take very many pictures of this craft... (Bad Blogger!) but I will write about it here anyway. A co-worker had bought some curtains for her house, one pair was too short and one pair was too long. She needed a piece put in to make the curtains longer, and she needed the other ones hemmed. I decided that if I was going to put a piece in one pair, I better put it in both, so that they all match.

It was very simple, and I picked a fabric that would make it even easier! A geometric pattern that gives you straight lines is definitely  the way to go!

What I did was randomly cut the curtains in two, then I sewed the fabric I purchased to the bottom of the curtain. This bit was very easy. The bit that was more tricky (but still pretty easy) was making the curtains the right length! I first measured from the bottom of the grommets to the end of the curtains the 84" they needed to be. This was wrong. Curtains hang from the TOP of grommets! Duh! So I had to readjust it. After I got one done, the only other hard part was making sure I put the extra panel in the same spot for the one it was going to hang next to. This just involved measuring and re-measuring several times before I sewed it up!

And the finished product was this:

I will try to get her to take a picture of them actually hanging in her house to add later!


Saturday, October 20, 2012

Re-Purposing Frames from the Thrift Store

A few weeks ago I was at one of the thrift stores here in town looking for something. I can't remember what it was, but while I was there I started looking at pictures. I mean, you never know, right? I found the most ugly things ever. But, while we were away this year, I had bought some matted prints that needed new frames. I decided to pick up some really ugly pictures just to use their really ugly frames for these prints.

The thing was, the frames weren't really that ugly, mostly they were only ugly because of what colour they were. I decided to get some spray paint, and make them what ever colour I wanted!


I wish I had thought to take a picture of what was actually IN these
so you could see how far my imagination had to stretch! They really don't look
all that bad once you take the stuff in them out, and give them a wash.
I made them a neutral vanilla colour to make the black matte really pop. We are moving
in a few weeks and I'm really hoping to begin a really awesome gallery wall, and
these will be a fantastic part of it!
And that's it! It couldn't have been easier really! I ALWAYS keep my eyes open when I'm at the thrift store. Sometimes you can find really awesome things there if you take the time to look at what you might be able to DO with it, and not just at what it already is!

Wednesday, October 17, 2012

Whale Art


Hello everyone. I have not posted on here in awhile, but I have been crafting! My latest one is soo simple! But so cute! All you need are 3 tiny canvases and 3 paint colours (1 dark blue, one light blue, & one white).

First, I drew the whale and the blow by hand very lightly in pencil, then I painted those areas white. Then, starting with the whale piece, I painted those areas dark blue. Then used the light blue for the top picture. I then mixed the two blues to create a medium blue (make sure you mix enough, as you will have a hard time matching the colour if you need to make more!). I painted with the medium blue the middle canvas, and voila! Finished product!


Monday, February 6, 2012

Ice Skate Winter Wreath

It's been a crazy few months for me, and I have been doing a little bit of crafting, but have not made time to add it to this new blog yet! I have been remembering to take some pictures though :) so I'll try and get some posts up this week.

This wreath here is inspired by Pinterest, it was one of the first crafts I had found there that I really wanted to try. The picture from pinterest ended up being a store bought wreath (you can click the picture to go to the website that sells it) but I though it looked do-able, so this is a little how-to for my version.


Pinterest Pic:
cutee

My completed version:

They ended up being very different. There are pros and cons to this.
Pro: My skate is newer, therefore is whiter.
Con: Because my skate is newer, it doesn't lace as nicely
Pro: Mine has a bird and berries wrapped around the sharp part
Con: My branches are not as long and straight
Pro: I made mine, the one above is store bough.

So, my skate for the win!!

This is how I made it, feel free to make changes to suit your skate wreath needs :)

First, get a skate, and clean it up real nice. I didn't have a figure skate, so I visited my local Salvation Army and bought a pair for $5.99 (and also found out they sell books there - amazing!!)

Then, lace your skate back up. I was very careful to choose the whitest side, and lace it up with no twists in it. If you are very particular, you could buy a new lace, but I am very frugal, and did not. It looked like this:
 Other materials you will need is some branchy things to stuff it with, and other festive decorations. A hot glue gun would probably help to. I had to use white glue.
Then I stuffed my skate with newspaper so it wouldn't be able to collapse in any places in the foot area as that would look pretty ugly after awhile.

 After that, I just stuffed my decorations into it, and glued a bird to the toe. Easy peasy.

 And this is the finished product from the back end, and again from the front. We hung it on the door to the porch instead of the front door so it didn't get weather damaged. I live in Canada after all :)
Hope you feel inspired :)